
Upgrading to a new iPhone or replacing a damaged one can be an exciting experience. However, it’s crucial to ensure that all your important data is safely transferred to your new device. In this article, we will delve into various methods that make the process of transferring data between iPhones efficient and effortless, catering to different situations like purchasing the latest iPhone model, switching between personal and professional devices, or setting up a phone for a family member.
This all-inclusive guide will introduce you to multiple data transfer techniques. Each method comes with its unique prerequisites and procedures, and we will provide a comprehensive, step-by-step guide to help you navigate through each method with ease. By the end of this post, you’ll have a solid understanding of how to select the most appropriate data transfer method for your particular needs and effectively transfer your data between iPhones, ensuring a seamless transition to your new device.
Method 1: Using iCloud
One of the most straightforward methods of transferring data from one iPhone to another is using iCloud. Apple’s cloud-based storage system makes it easy to backup and restore data, and it’s also accessible from any device with an internet connection.
Preparation Before Data Transferring
Before you start transferring your data from one iPhone to another, it’s important to prepare both devices properly.
First, make sure that both iPhones are updated to the latest version of iOS. This will ensure that the devices are compatible and the transfer process will go smoothly.
Next, back up your current iPhone. This step is crucial as it ensures that all of your data is saved in case something goes wrong during the transfer process. You can back up your iPhone to iCloud or iTunes.
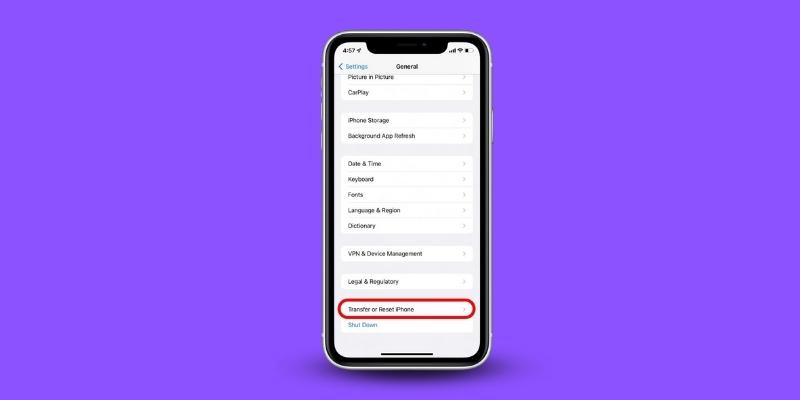
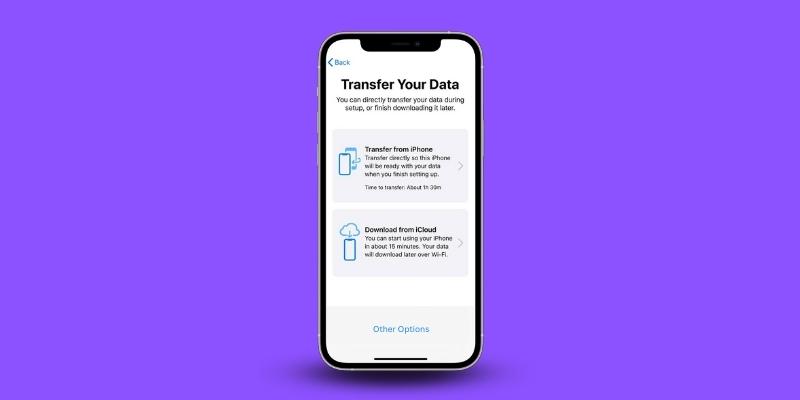
Here is how to prepare to transfer data from iPhone to iPhone:
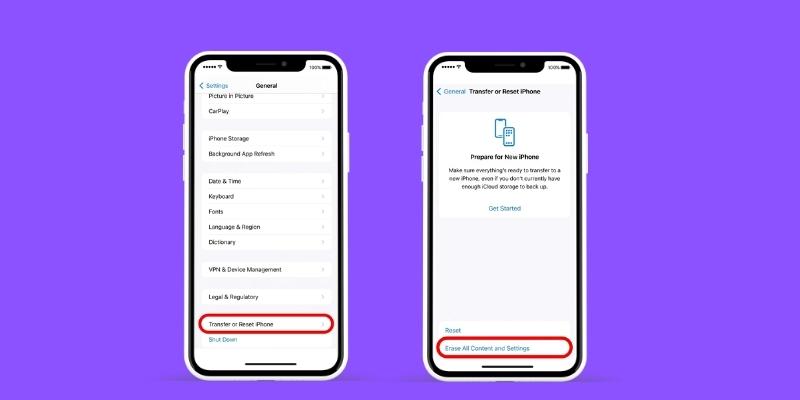
- Step 1: Go to Settings > General.
- Step 2: Tap on “Transfer or Reset iPhone”
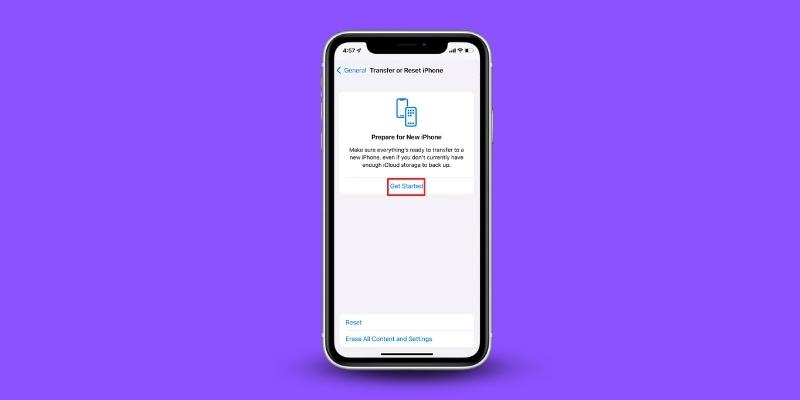
- Step 3: Prepare for new iPhone tap on “Get Started“
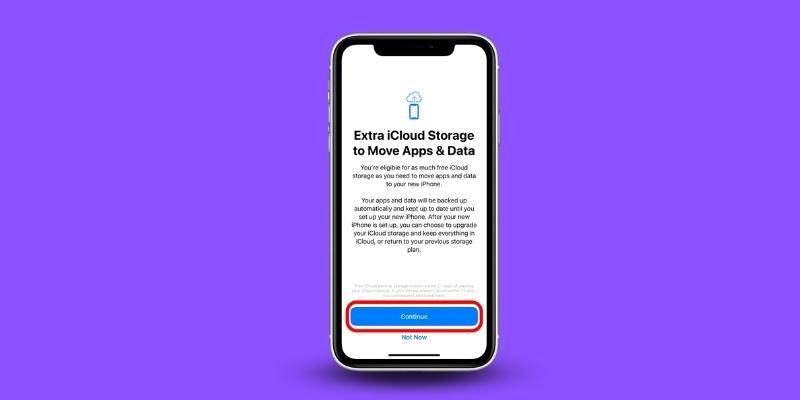
- Step 4: On this page read the Message and tap on “Continue” and then “Done“
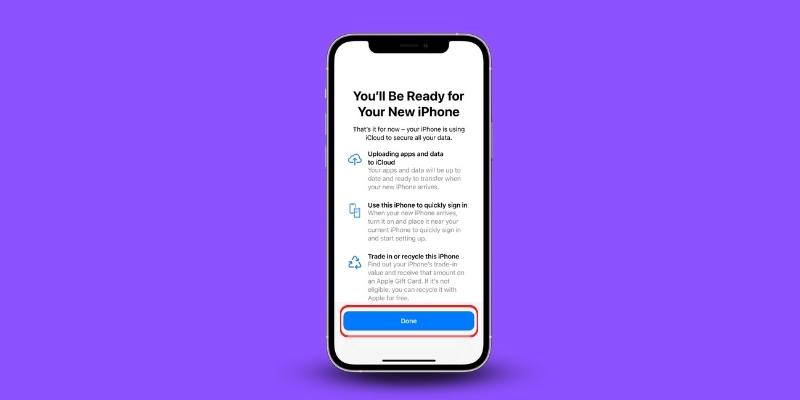
- Step 5: The preparation process will take about 40 minutes to one hour.
Once the backup is complete, you’re ready to start transferring your data to your new iPhone.
Note: The Backup file will be automatically deleted in 21 days.
Here’s how to transfer data using iCloud:
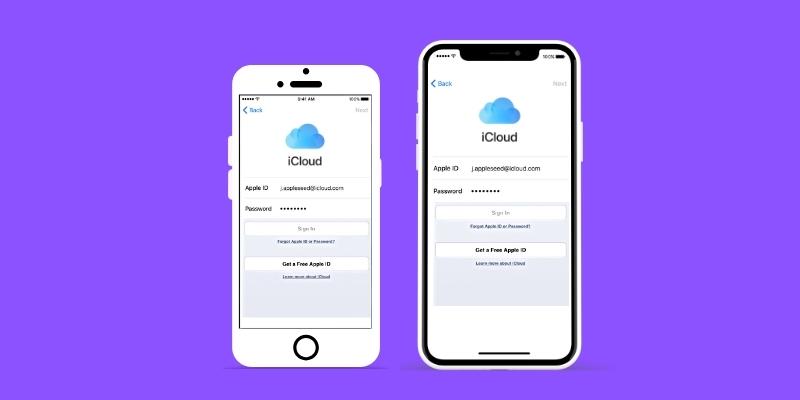
- Step 1: Connect both iPhones to Wi-Fi and sign in to iCloud using the same Apple ID.
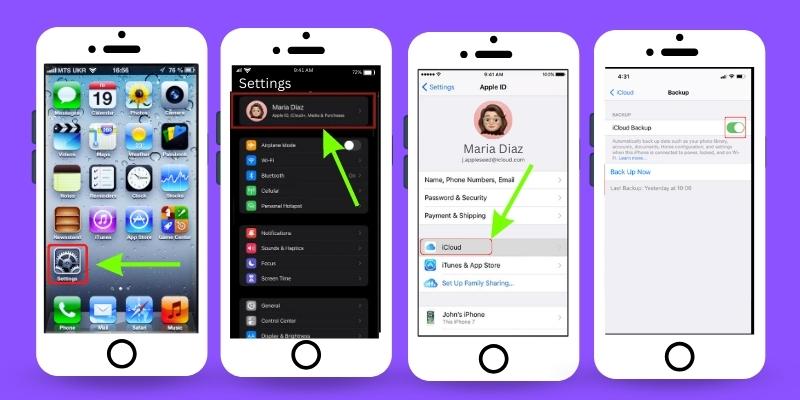
- Step 2: On your old iPhone, go to “Settings” then tap on “Your Name” top of the settings, then “iCloud”. Make sure “iCloud Backup” is turned on.
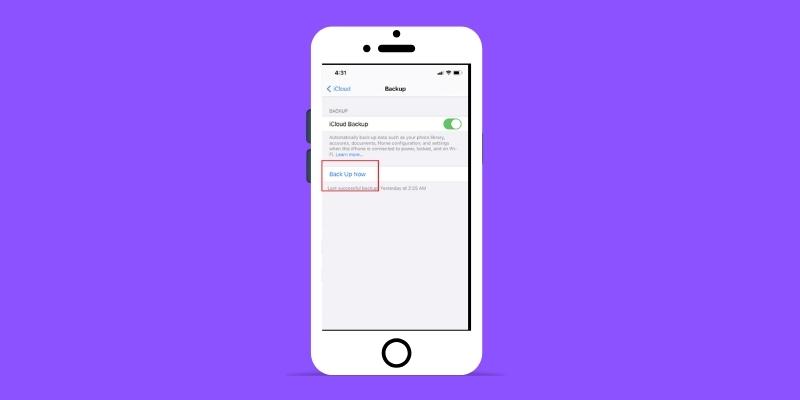
- Step 3: Tap “Back Up Now” to initiate the backup process. Wait until the process is complete.
- Step 4: On your new iPhone, go to “Settings,” then “General,” scroll down and tap “Transfer or Reset iPhone.” Choose “Erase All Content and Settings.”
- Step 5: Follow the setup process until you reach the “Apps & Data” screen. Choose “Restore from iCloud Backup,” and select your old iPhone’s backup.
Wait for the restore process to complete, and your new iPhone should have all your data.
Method 2: Using iTunes
If you prefer using iTunes to transfer data, here’s how to do it:
- Step 1: Connect both iPhones to your computer using the Lightning cable.
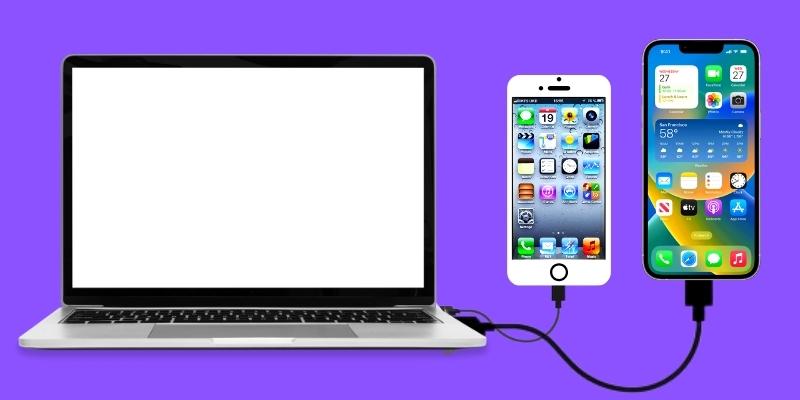
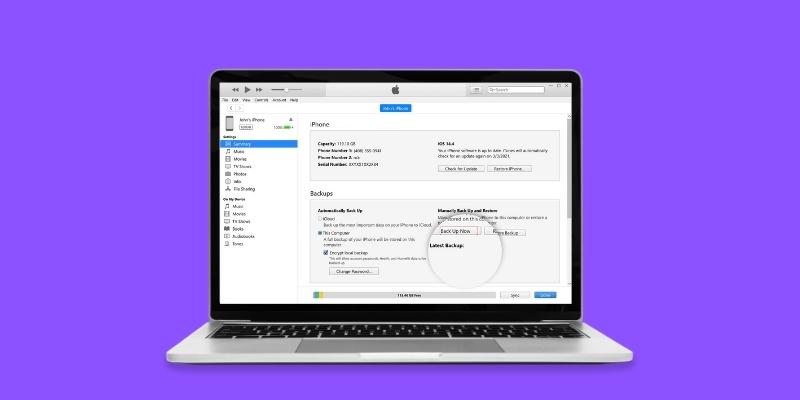
- Step 2: Open iTunes and click on the device icon for your old iPhone.
- Step 3: Click on “Back Up Now” to create a backup of your old iPhone.
- Step 4: After the backup process is complete, click on the device icon for your new iPhone.
- Step 5: Click on “Restore Backup” and select your old iPhone’s backup from the list.
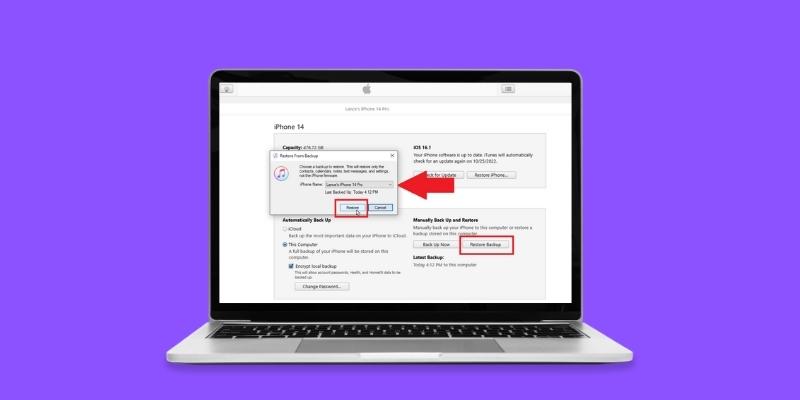
- Step 6: Wait for the restore process to complete, and your new iPhone should have all your data.
Method 3: Using AirDrop
AirDrop is a feature built into iOS that allows you to transfer data wirelessly between devices. It’s an easy and quick way to transfer photos, videos, and other data.
Here’s how to transfer data using AirDrop:
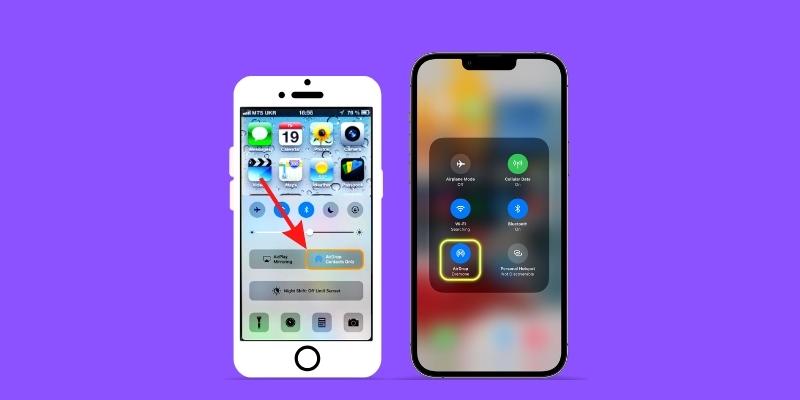
- Step 1: Turn on AirDrop on both iPhones. On the Control Center, tap the AirDrop icon, and choose “Everyone” or “Contacts Only.”
- Step 2: On your old iPhone, select the photos, videos, or other data you want to transfer.

- Step 3: Tap the “Share” icon and choose “AirDrop.”
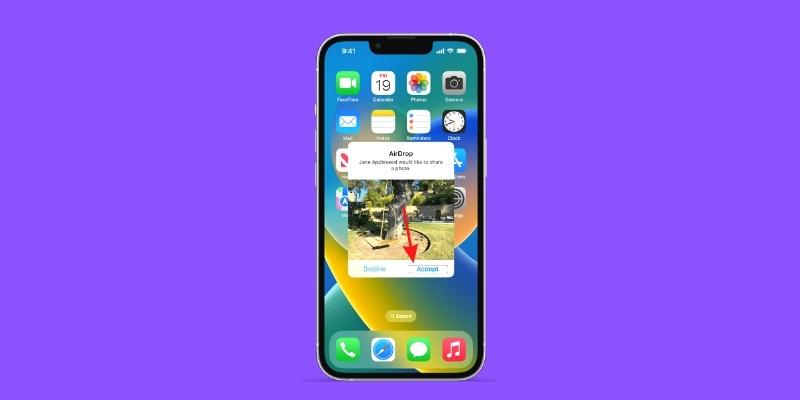
- Step 4: Select your new iPhone from the list of devices and tap “Send.”
- Step 5: On your new iPhone, accept the data transfer, and wait until the process is complete.
Method 4: Using Windows PC
If you prefer to use a Windows PC to transfer your data, you can do so by connecting both iPhones to your computer. This method is ideal if you have a large amount of data to transfer, and you want to ensure a secure and fast transfer.
Here’s how to transfer data from iPhone to iPhone using a Windows PC:
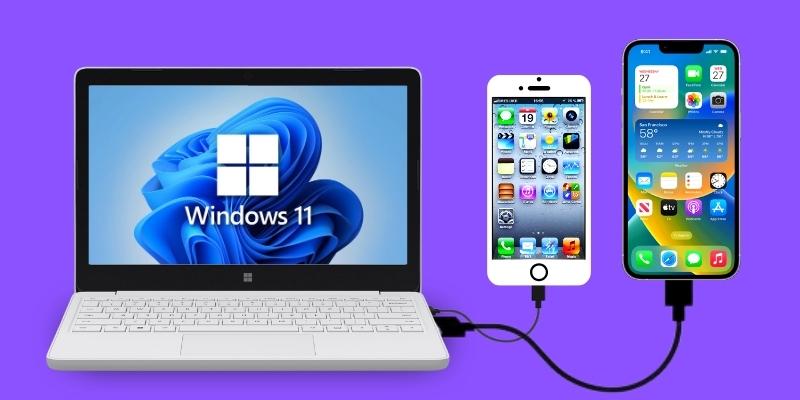
- Step 1: Connect both iPhones to your computer using the Lightning cable.
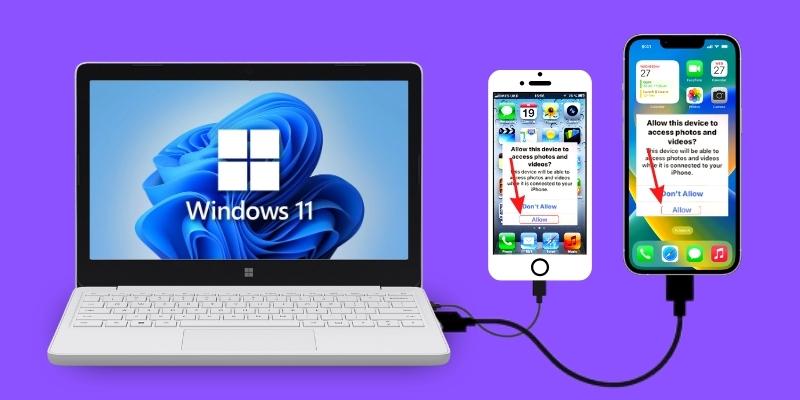
- Step 2: When you connect iPhone to computer a pop-up massage will show on your iPhone “Allow this device to access photos and videos” tap on “Allow” button)
- Step 3: Open the Windows File Explorer and click on the device icon for your old iPhone.
- Step 4: Open the internal storage and copy all the data you want to transfer to your computer.
- Step 5: Disconnect your old iPhone and connect your new iPhone to the computer.
- Step 6: Open the Windows File Explorer again and click on the device icon for your new iPhone.
- Step 7: Open the internal storage and paste all the data you copied from your old iPhone.
- Step 8: Wait for the transfer process to complete, and your new iPhone should have all your data.
Method 5: Using Third-Party Apps
While Apple provides built-in options for transferring data between iPhones, you may prefer to use third-party applications for additional features, convenience, or compatibility with other devices. In this section, we will discuss some popular third-party applications for iPhone data transfer and provide a step-by-step guide for using one of these applications.
Popular third-party apps:
- AnyTrans
- EaseUS MobiMover
- dr.fone – Phone Transfer
- MobileTrans
Pros and cons of using third-party applications:
Pros:
- Additional features such as selective data transfer and cross-platform compatibility.
- Transfer data without the need for iTunes or iCloud.
- Simplified user interface and process.
Cons:
- May require payment for full functionality or additional features.
- Trusting third-party software with sensitive data.
- Potential compatibility issues with future iOS updates.
Troubleshooting Common Issues
Even though data transfer between iPhones is designed to be straightforward and user-friendly, you may occasionally encounter issues or challenges during the process. In this section, we will address some common problems that users might face while transferring data and provide practical solutions to help you overcome these obstacles, ensuring a smooth data transfer experience.
Incomplete or failed data transfer:
- Check your Wi-Fi connection to ensure that both iPhones are connected to the internet and have a strong signal.
- Verify that you have enough storage space on your new iPhone to accommodate the data being transferred from the old device.
- Restart both iPhones and try the data transfer process again.
Missing data after transfer:
- Make sure that you have selected the correct backup, especially if you have multiple backups from different devices or timeframes.
- Double-check if the missing data, such as photos or messages, are stored in a separate app or cloud service (e.g., Google Photos or WhatsApp) that may require additional steps to restore.
- If you have used iTunes or Finder for the transfer, ensure that the “Encrypt local backup” option was selected, as this includes sensitive data like passwords and Health app information in the backup.
Connectivity issues during transfer:
- Keep both iPhones in close proximity during the transfer process, particularly when using Quick Start or a third-party application that relies on Wi-Fi or Bluetooth connections.
- Disable any VPN or firewall settings that might interfere with the data transfer process.
- Update both iPhones to the latest iOS version, as this may resolve any compatibility issues.
Tips for resolving common issues:
- Always ensure that your iPhones are charged adequately before beginning the data transfer process to prevent any interruptions due to low battery.
- Regularly backup your data to avoid losing any important files or settings, particularly before starting a data transfer.
- If you continue to experience issues with data transfer, consider reaching out to Apple Support or consulting the official support documentation for additional assistance.
By addressing these common issues and their respective solutions, you can confidently navigate the data transfer process and ensure that your essential files, photos, and settings are securely moved to your new iPhone.
Frequently Asked Questions (FAQ)
Yes, you can transfer data from iPhone to iPhone without a computer using methods such as iCloud, AirDrop, or third-party apps.
Yes, you can transfer data from a jailbroken iPhone to another iPhone using a Windows PC, following the same steps as for a non-jailbroken iPhone.
No, you shouldn’t lose any data during the transfer process as long as you follow the instructions correctly. However, it’s always a good idea to keep a backup of your data in case of any unexpected issues.
Conclusion
In this article, we have explored various methods to effectively transfer data between iPhones, ensuring that your valuable files, photos, and settings are securely provide to your new device. By discussing multiple techniques, including iCloud, iTunes, AirDrop, windows pc, and third-party apps, we have provided you with a comprehensive understanding of how to choose the most suitable data transfer method for your unique needs.
By understanding and utilizing the various data transfer methods discussed in this post, you can enjoy a seamless transition to your new iPhone while keeping all your important data safe and secure.